
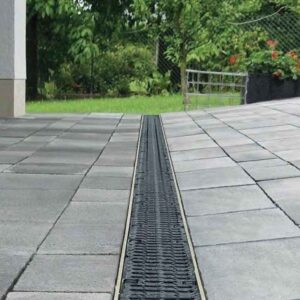
During periods of heavy rainfall, it’s quite common for surface water to develop on the grounds of a property. However, if this is becoming a frequent issue, or you notice water building up around exterior walls, it could be time to invest in a soakaway.
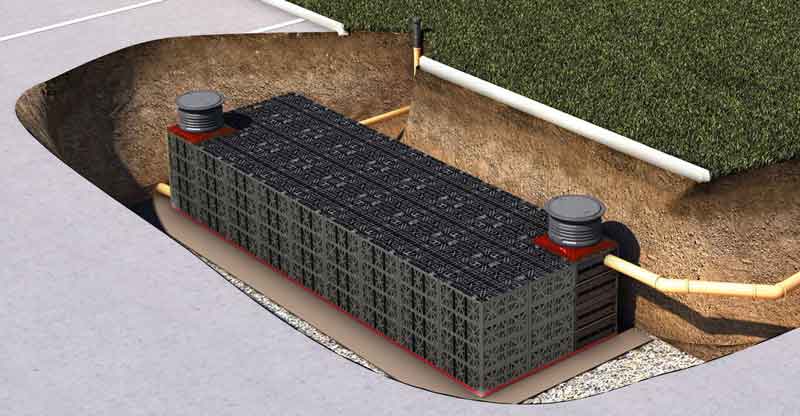
A handy addition to your current drainage system, a soakaway is a hole that is dug in the grounds of your property and filled with modified plastic crates. It works by collecting excess rainwater and allowing it to percolate back into the earth when your home’s primary drainage system experiences a surge in demand.
Soakaways are easy to install and require very little maintenance over their lifetime. Due to this easy use and their promotion of healthy garden turf, they’ve become known as one of the most eco-friendly solutions for combating excess surface water.
Table of contents
- What is a soakaway?
- Types of soakaway
- Before installation of a soakaway
- Where should I install the soakaway
- Which materials do I need to build a soakaway?
- How to choose and install a soakaway crate
- How can I tell if a soakaway is blocked?
- How to unblock a soakaway
- Where can I buy Stormwater storage crates?
What is a soakaway?
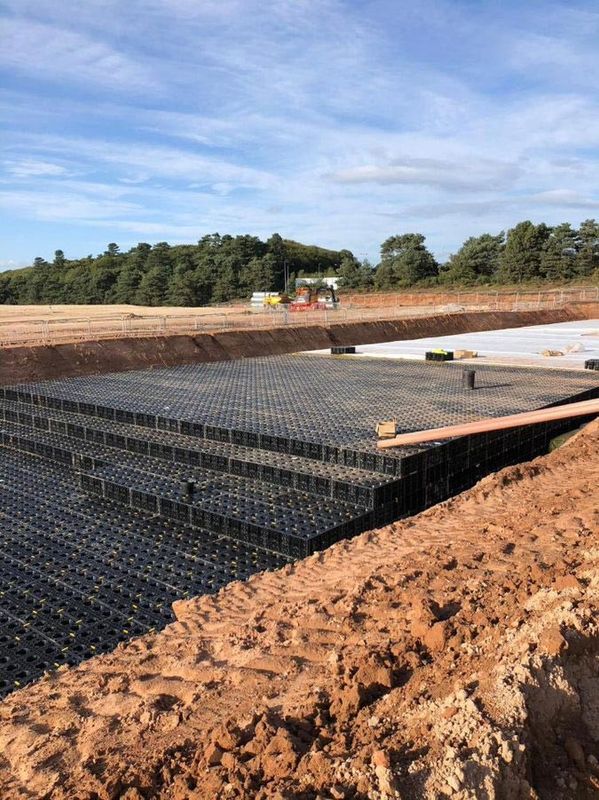
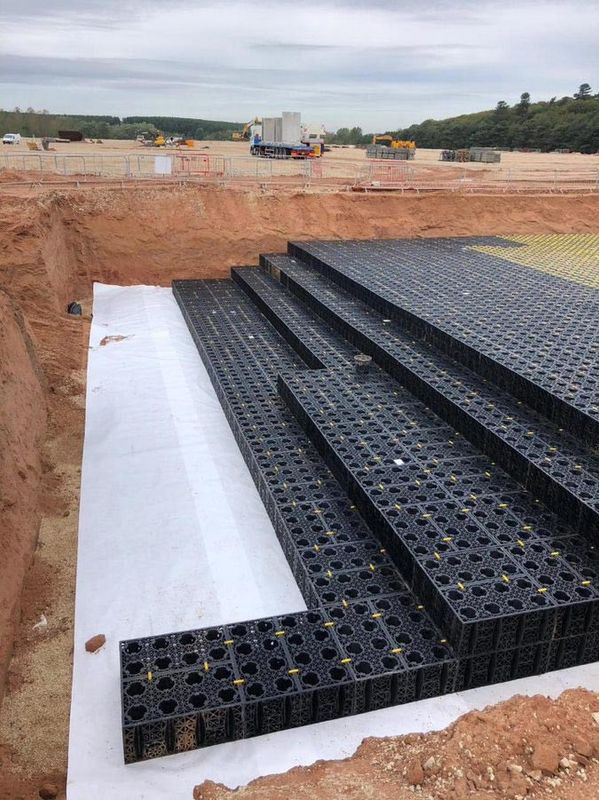
A soakaway is a large hole dug in the grounds of a property to collect and temporarily store rainwater or surface water before slowly discharging it into the surrounding ground. Usually constructed between five and ten metres away from a property, it takes advantage of a permeable membrane to control the flow of water into the ground so as not to overwhelm the soil and create waterlogging.
Rainwater is directed to the soakaway via a property’s drainage system and as rainfall intensifies the hole begins to fill with water. The filling material ensures the water percolates back into the earth at an acceptable rate.
Types of soakaway
Stormwater storage crates are perfect for filtration or attenuation. They are lightweight storm and surface water management systems. Easy to assemble and install.
So, what are the differences between stormwater storage crates for filtration and attenuation? Let’s find out.
Stormwater storage crates for filtration
You can achieve filtration with storm crates with the addition of a geotextile.
Want to return storm or surface water to the natural environment? Wrap the modular crates in geotextile. This allows for a gradual soakaway.
Stormwater storage crates for attenuation
Stormwater attenuation crates work a little differently but still work well for storm water drainage.
For attenuation of the storm or surface water, you must wrap crates in a damp-proof membrane to hold the water.
This design allows you to slowly release water into storm water drains with the help of a vortex valve. It is suitable if your local authority places a limit on the flow rate of the water you send to drains.
It also works for smaller commercial projects or domestic projects. This is because you can hold the water until it can be returned to a rainwater harvesting system.
For domestic projects in need of a shallow dig, the Graf Infiltration Tunnel weighs in at only 11kg. So you can handle it easily. If the tunnel will not need to take on any load bearing, the smallest earth covering is just 250mm.

Before installation of a soakaway
A soakaway is something you can build yourself, but there are a couple of things to be aware of before you get underway.
Consult your local planning department
Before checking the soil or inspecting the land you must check local planning regulations, especially if you’re including the soakaway as part of an addition or extension to your property. Some areas are protected or are near a watercourse so you’re unable to install a soakaway. When you get the confirmation that a soakaway is allowed you can continue as planned!
Soil percolation test
It’s best to start by carrying out a soil percolation test to determine the absorption rate of your soil. Use our guide on carrying out your own soil percolation test to see if a soakaway is a viable option for you. If the soil is too soft it will absorb the water without releasing it, making the soakaway useless over time.
Check your chosen installation site is available
Once you’ve confirmed a soakaway is viable you can then check the area for pipes and cables. Look out for any form of electricity cable, gas mains, water mains and even street lighting cables as damaging any of these while constructing your soakaway can end up being very costly.
Where should I install the soakaway?
Before building a soakaway, it’s always best to check your local authority’s building regulations. Some policies stipulate where surface water needs to be collected and treated, so it’s best to arm yourself with the knowledge of any local stipulations before you begin the installation.

Once you’re satisfied your soakaway meets building regulations, we recommend you build it at least five metres away from your property. Bear in mind that the further your soakaway is situated from your property the longer the pipes will need to be, which could increase the chance of blockages over time and this will add to the build cost. If you want to keep your soakaway at the bottom of the garden so you can lay decking or patio, this could be worth the additional cost.
Which materials do I need to build a soakaway?
Make installation as easy as possible by investing in soakaway crates, geotextile membranes and silt traps. Not only will these aid installation, you’ll also find the lifespan of your soakaway will improve too.
Soakaway crates
Soakaway crates help to control the level of surface water, particularly in areas that are prone to flooding. Crates can be combined with waterproof geotextile and pipework to create a system that redirects water at a more acceptable flow rate. Wrapping soakaway crates in permeable geotextiles allows water to slowly leak into the surrounding earth, reducing stagnating surface water. Soakaway crates are modular and can be placed next to and stacked on top of each other, allowing you to create a system that meets your size requirements.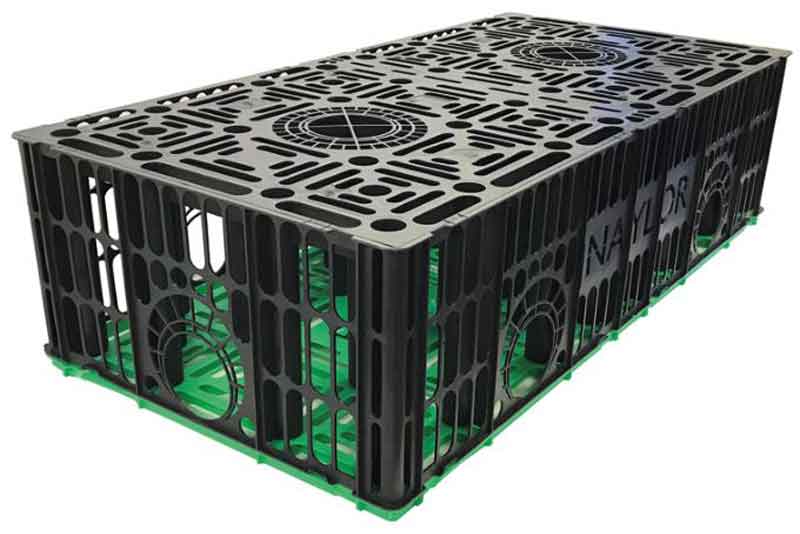
Geotextile membrane
Geotextile membranes (geotextiles) are permeable fabrics that can prevent unwanted materials from entering a drainage system. Non-woven geotextiles are best for drainage or filtration and are easy to fit. Simply wrap each side of your soakaway crate in the geotextile fabric and fit into place with staples or strong tape.
Silt trap
You can improve the efficiency and lifespan of your drainage pipe by adding a silt trap. It prevents debris and silt from building up within the drainpipe, reducing the risk of blockages, flooding and damage. It will need to be emptied from time to time, but this minimal maintenance will increase the lifespan of your soakaway system.
Shingle
One of the last stages of installing a soakaway system is to begin filling in the sides and back of the crate(s). We recommend doing this with shingle. You can also add a layer of shingle on the top of the crate and subsequently fill it in with the soil before topping it with finishing products such as gravel.
Gravel
Gravel is a great material to use as the final layer to top off your soakaway system. It looks good, requires minimal maintenance and can be topped up over the years.
Traditionally, soakaways were filled with gravel and rubble instead of soakaway crates. These days we recommend using crates as they save time, provide a long-term solution to surface water issues, and are incredibly sturdy and durable.
How to choose and install a soakaway crate
Installing a soakaway is a fairly straightforward process but the initial work has to go into choosing the correct type and number of soakaway crates so that the system works. If you only install 5m3 of soakaway, when the levels of rainwater mean you need 10m3, the soakaway will become overwhelmed and rainwater will start to back up in the pipe system!
Domestic, commercial and industrial buildings can all use the benefits of these storm crates. They are easily installed in up to ten layers beneath buildings, with a 95% void ratio. You can thus achieve an effective system with a small number of crates.
Choosing soakaway crates
Soakaway crates are modular and so each type has technical specifications which tell you how much water they’re able to hold. The results of your percolation test combined with the space you have available and the scale of any waterlogging issues will determine how much water you need to be able to hold in the soakaway crates.
Once you know the volume of water, you can choose which soakaway crate to buy and how many to buy. Some popular soakaway crates include:
- Graf Rain Bloc soakaway crate (3.3 crates per 1m3)
- Polypipe Polystorm soakaway crate (5 crates per 1m3)
- Aquavoid Stormwater soakaway crate (2.5 crates per 1m3)
- Brett Martin StormCrate55 soakaway crate (4 crates per 1m3)
Installing a soakaway
- Begin the installation process by excavating the correct size area for your soakaway crates to sit
- Excavate a trench for the drainage pipes that will bring the rainwater or surface water to the soakaway
- Lay a permeable membrane on the bottom of the crate trench, making sure there’s enough membrane to come up the sides and cover the top of the modular crates
- We recommend you fit a silt trap to catch any debris and silt which will render the soakaway inefficient over time
- Check for the pipe entry point and cut out a section of the membrane so the pipe will fit snugly. Ideally, the membrane will cover the pipe like a flashing
- Backfill the sides of the soakaway with shingles being careful not to dislodge the membrane or pipes.
For more information on building a soakaway, visit our tips and advice page.
How can I tell if a soakaway is blocked?
Waterlogging in the ground near the soakaway is one of the most obvious indications of a blockage. As the soakaway is situated underground it can be hard to tell what has caused the blockage. It’s typically one of these four reasons:
- a build-up of silt and sediment in the system
- compacted soil
- root ingress from the surrounding tree
- some form of system collapse.
The best way to avoid blockages is to correctly install your soakaway. This might sound frustrating, but spending extra time and care at the installation stage will save you time and money further down the line. It’s also worth considering installing extras such as silt traps, which will reduce the amount of silt entering the system and subsequently reduce the risk of blockages.
If you’re worried about installing a soakaway, it’s a job that can be done by professionals. A reputable tradesperson or company should be able to install a domestic or commercial soakaway and recommend the number of crates you’ll need for the job. Modern, plastic soakaway crates are designed to last many years so nailing the installation stage will set you up for the future.
How to unblock a soakaway
It’s more a question of whether can you unblock a soakaway rather than how you unblock a soakaway. And the answer is that sometimes you can and sometimes you can’t as it depends on what is causing the blockage. If your soakaway does become blocked it might be time to call in the professionals.
A build-up of silt and leaves in the pipework can occasionally be rectified with high-pressure water jets. Although this method is only successful in around 50% of cases so it’s advised to think realistically about the outcome. It’s also not a do-it-yourself task. Your best chance of success is to call in the professionals who’ll be more experienced in this type of work.
If a pipe has collapsed or been perforated by a tree root, the only option available is to replace any damaged sections. If you confidently installed the soakaway system you could consider doing this work yourself, but if you have any doubts it’s best to call in an expert. In some cases, you might find that the entire system needs replacing, so keep this in mind if you’re considering doing the work yourself.
Before replacing your soakaway system, check your building insurance policy as you may be covered for the cost of repairing or replacing parts of your drainage system.
Where can I buy Stormwater storage crates?
Right here at Drainage Superstore! We have soakaway crates from leading brands at competitive prices. Big and small. Go ahead and check them out!
Was this guide useful?
Mentioned in this product guide:


