A soil percolation test is an essential aspect of drainage that will determine how fast soil absorbs water.
It’s used to work out which method of drainage the area should use as different soils absorb water at different rates. If the soil doesn’t absorb water very well then you’re unable to install a soakaway system, for example.
But what is the procedure for a soil percolation test?
Read on to find out.
 Table of contents:
- What is a soil percolation test?
- What do I need to carry out a soil percolation test?
- How do I carry out a soil percolation test?
- How do I interpret the results of a soil percolation test?
What is a soil percolation test?
A soil percolation test, also known as a perc test or a percolation test, is a method used to determine the rate at which water can infiltrate or drain through the soil.
It is typically conducted to assess the suitability of soil for various purposes, such as septic system installation, construction projects or stormwater management.
The test involves creating a test hole in the ground and measuring the rate at which the water level drops in the hole over a specified period.
What do I need to carry out a soil percolation test?
A percolation test should not be carried out in adverse weather and if it’s done in summer then the times produced should be increased just to make sure that there’s scope for winter rainfall.
A percolation test doesn’t require any specialist tools. You need:
- Shovel
- Tape measure
- Container for transporting water or a hose that will reach the percolation test site
- Stopwatch
- Notepad and pen
How do I carry out a soil percolation test?
Step 1: Start digging
Dig a hole using a backhoe, auger, or shovel. It should be 300mm x 300mm and 300mm deep at your drainage site. Remove any loose stones or litter from the hole. Scrape the sides of the hole to make sure they are clean.
Step 2: Fill the hole
Fill the hole up to 300mm deep with water and allow it to drain overnight. This step is crucial to ensure that the soil is fully hydrated before conducting the test.
Step 3: Measure the initial water level
Use a measuring tape or ruler to determine and record the initial water level in the hole. This measurement will be the starting point for your percolation test.
Step 4: Start timing
Start timing the test as soon as the water level reaches the initial level recorded in the previous step. Measure and record the drop in water level at specific intervals, such as every 15 minutes, 30 minutes, or 1 hour.
The duration of the test can vary depending on local regulations or project requirements, but it typically lasts for a minimum of 1 hour.
Step 5: Refill the hole
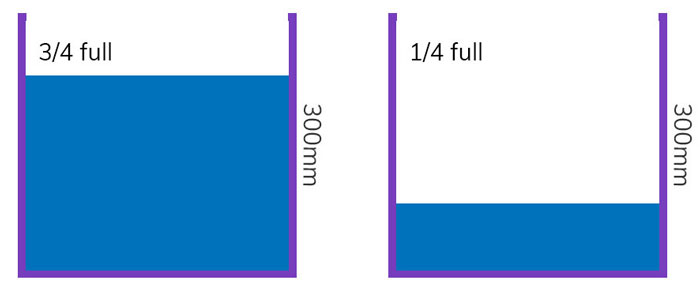
Fill the hole again to 300mm and note in seconds how long it takes to go from 3/4 full to 1/4 full.
Next:
Divide the seconds it takes by 150. This number is known as the Vp ,and it’s the average time it takes for the water to drain by 1mm.
Step 6: Rinse and repeat
Perform this test in a similar area with different patches of the ground at least another 2 times.
Compare the percolation rates from different test holes and assess the suitability of the soil for the intended purpose.
You can take the average figure from the tests at your final Vp.

How do I interpret the results of a soil percolation test?
Before some types of drainage products (sewage treatment plants, for example) are given approval by the local authority, they require a soil percolation test.
Some councils will accept the results of your own test, but some will want a qualified professional to carry this out. If you’re unsure of your own test results it’s advisable that you contact a specialist.
To begin to consider using a soakaway system as a drainage method you must achieve a minimum Vp of 15. The design of a soakaway system is dependent on the Vp too. The longer it takes to drain, the longer the pipework design field should be.


