
Installing ACO drains is a very simple, straightforward process that anybody can do using the step-by-step guide below. ACO supplies A15 pedestrian channels and B125 driveway channel drains, so when you purchase an ACO drain all you need is the information below to find out how to install an ACO drain.
ACO BrickSlot drains will be slightly different due to their thin slot orifice so please contact our drainage experts on 01752 692 221 for advice on fitting.
Table of contents
What is an ACO drain?
ACO is one of the most popular ranges of channel drainage available. As a company, ACO has over 70 years of developing and manufacturing innovative and high-quality drainage systems for domestic, commercial and industrial use. ACO drains are simply drainage products manufactured by ACO.
With that said, let’s move on to what you need to do to install an ACO drain!
Step 1: Prepare the area
Excavate a neat trench at the installation site to the depth and width of your chosen ACO drain. A line will need to be fixed along the length of the proposed channel run in order to determine the alignment and finished height.
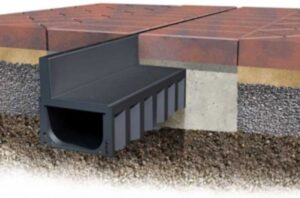
Step 2: Lay a firm base
The type of material you need depends on the loading class of the ACO drain. If the ACO drain is for pedestrian traffic only, then a compacted fill can be used along the base of the trench. However, a bed of good-quality concrete is required if the ACO drain is in an area where there will also be vehicles.
Step 3: Prepare the ACO drain outlet
In order to allow connection to the drainpipe, the preformed outlet will need to be cut out. This is located at the base of the ACO drain channel.
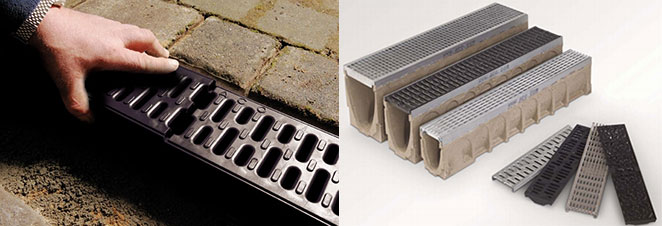
Step 4: Assemble the components
The channels will then need to be connected together as well as fitting the end caps on. This will need to be done before the assembly can be placed into the run.
Step 5: Prepare for backfilling
Once the assembly has been connected, mask along the grates, ensuring it covers the entire length of the run. The ACO drain can then be lowered into the trench and sealed to the drainpipe before packing it to the correct level.
Step 6: Complete the installation of ACO Drain
The ACO drain channel run will then need to be surrounded with either backfill or concrete which needs to be finished 2-3mm above the grate. After this has been done, remove the grates, masking tape and debris from the channels and ensure all outlets are clear. The grates can then be put back into place to complete the installation.
![aco-doorway-drain-installed-14895-2[1]](https://static.drainagesuperstore.co.uk/help-and-advice/wp-content/uploads/2017/10/aco-doorway-drain-installed-14895-21.jpg)

Was this guide useful?
Mentioned in this project guide:


