
Over time, bottle gullies can get clogged with waste and sewage. If you find yours needs maintenance, you don’t need to run to a professional cleaning service to get it sorted. Instead, we’ll teach you about clearing out your bottle gully using the simple and effective rod method in some simple steps.
Table of contents
- What is a bottle gully?
- How to rod a bottle gully using a drain rod
- Can I prevent my gully from blocking in the future?
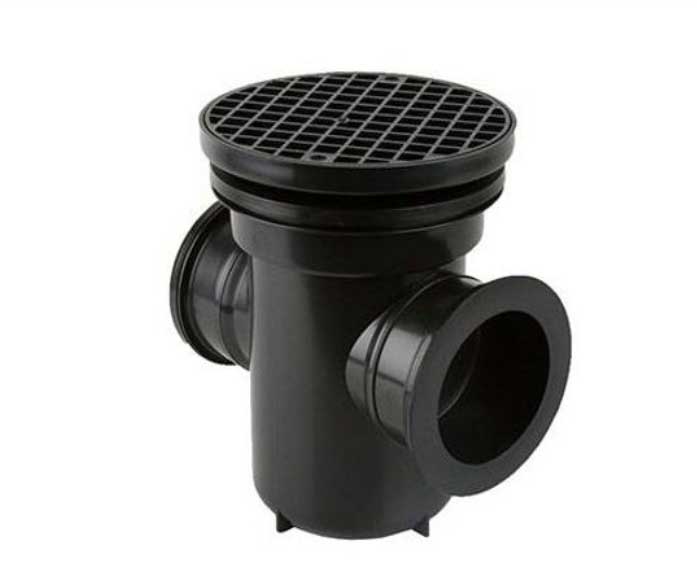
What is a bottle gully?
Before you clean your bottle gully, know what you’re working with. Our drainage gully buyer’s guide will help you get familiar with the structure of a bottle gully. You never know, you might also find you need new parts for your gully to make it more efficient – like a new gully grate!
How to rod a bottle gully using a drain rod
Now you’re familiar with bottle gullies, get some tools ready. Here’s a list of what you’ll need:
- Drain rod (comes in sections)
- PPE (Goggles, face mask, thick rubber gloves and overalls)
- Bucket
- Screwdriver (flathead)
- Trowel
Step one: Prepare for the cleaning process
Throw on your PPE and make sure no one is planning to use the bathroom or kitchen space. That includes washing machines and dishwashers. The PPE will help protect you against the mess and bacteria and stopping any home activities can prevent you from getting wet while doing the job.
Step two: Find the gully
Often, you will find your gully hiding under a plastic or metal grate. This is what’s known as a gully trap. It’s a tool that prevents the pipe from being blocked by dirt and debris (e.g. leaves and twigs). However, as good as it is, the debris can pile up and become stiff on the gully trap. This prevents water from passing through, causing floods and stinky drainage space.
Step three: Take off the gully cover
If you have placed a trap over the gully opening, remove this using your flathead screwdriver to pry it open. Some traps have a handle which makes the job easier. This will likely be the first place you realise the PPE is important, as pulling the gully (depending on how stiff it is) might cause a splash over you.
No luck with the screwdriver? Try using some string by threading it around the gully trap’s bars and tugging on it. This should help it come loose, giving you access to the gully.
Step four: How does the inside of the gully look?
If there are visible blockages, use your trowel (or your hands if you’re wearing gloves) to clear them out. You’ll probably find twigs, leaves and other bits of debris as you do so. This hand removal will help make the gully work as soon as possible.
At this point, you can also try giving your kitchen taps a whirl to see if the water is draining properly again. If running as intended, you’re good to pack and clean up! If not, it’s time for step five.
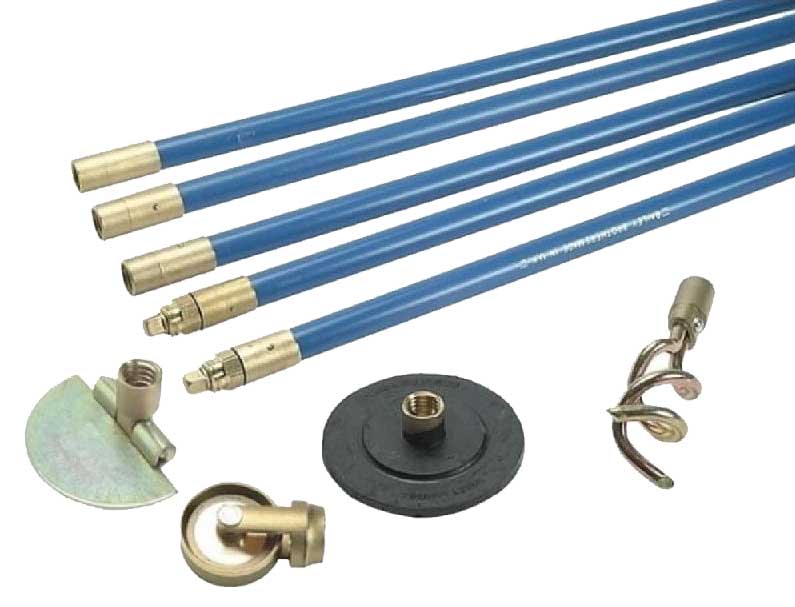
Step five: Grab your drain rod
Drain rods are flexible rods (usually one metre long). They come in sections and screw together to be inserted into the drain to clear those tough blockages. Start with one section to see if you can reach the blockage at this length. If not, add until you can feel the blockage.
Feel the blockage? Okay. Now carefully poke it with the rod to break it into smaller pieces. This will make it easier to work with and easier to flush away through the drain. Do NOT push too hard as this can risk pushing the blockage down further and might cause additional issues.
Make sure not to rotate the rods anticlockwise either! This could unscrew the rod sections and give you another problem to worry about.
Step six: Grab your garden brush and hose for a tidy up
Using your garden bush initially, clear away any debris around the gully to stop it from flushing back down the system while the trap is off. Once that’s cleared, position the hose down the gully for a few minutes to help flush the pipe of leftover blockages.
Step seven: Fill your bucket with hot water to flush out the gully
Gently pour the hot water from your bucket into the gully to help dislodge grease or fat lingering inside. You could also add a little bleach or washing up liquid if you want to make the process more effective.
Note: Make sure your drainage system is a combined system before using washing up liquid or bleach as using putting it into this sort of system can risk polluting a watercourse if it isn’t.
Step eight: Test your gully before reattaching the trap
Run your kitchen taps for at least several minutes, monitoring your gully as you do so, to check if the system is draining as needed. If you’re happy with it, reattach the trap.
There you go! How to rod a bottle gully. It’s as simple as that.
Can I prevent my gully from blocking in the future?
You can indeed! Starting with the area around the gully. Keep this area clear to minimise debris from flushing into the system. Oh, look at the gutters too! Moss, leaves and other debris could be sitting in them, which could rain through your pipes and fall into the gully. So, clearing these out as soon as possible will be an efficient way to help minimise blockages.
You’ll also want to avoid disposing of anything that could cause serious blockages in your gully, including:
- Ground coffee
- Cigarette ends
- Sanitary products
- Paper towels
- Facial tissues
- Disposable nappies
- Cat litter
Also, don’t flush too much paper down the toilet in one go and minimise washing fat and grease down the sink. These are all things that contribute to blockages. So, the more preventions you put in place, the less time you’ll spend unblocking your gully.
We’ve got many more drainage help and advice to ensure your gullies and other drainage systems are looked after, as well as buyer’s guides to guarantee you make the most efficient choice for your requirements.

Was this guide useful?
Mentioned in this project guide:


