Soakaway crates are growing in popularity, compared with the more traditional method of filling the hole or soakaway with rubble. They are lightweight, easy to transport and easy to install, and definitely worth investing in. For more information on why soakaway crates are beneficial over rubble, check out our guide here.
What is a soakaway?
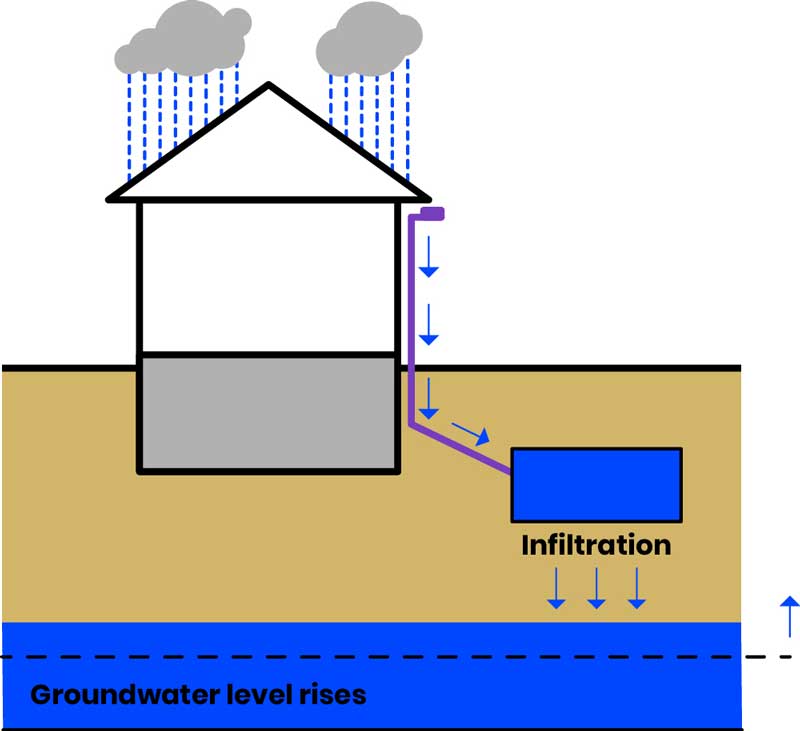
Soakaway crates are large plastic crates that help to control the rate at which the water filters through the soakaway. Soakaways are mainly created as a solution to standing surface water. They consist of a large hole or pit that receives surface water from a drainage pipe and helps the water to slowly percolate through the soil, reducing the risk of flooding and improving the stability of the ground.
Before installation
Soil percolation test
Before creating a soakaway, we’d recommend carrying out a soil percolation test. This is a test to determine the absorption ability of the soil, and whether water will pass through. This can be done by yourself if you’re confident in doing so, or you can ask a professional to come and take the soil percolation test.
Check the area for pipes and cables
Before beginning the installation process, you must also check that the area you are considering for installation has no underground drainage or cables running through – this includes electricity cables, gas mains, water mains, drainage pipes and street lighting cables. If you accidentally cut through or damage any of these, it can cause dangerous and potentially costly issues.
Planning and regulations
When planning a soakaway, if it is part of the work being undertaken on a new build or extension, it must be marked on the plans. Soakaways should be a minimum of 5 metres away from the property or road, or more if the ground slopes towards the property.
Preparing for installation
The first step in preparing for the installation of your soakaway is to excavate the area for a soakaway crate and a trench in which the drainage pipe will sit. When calculating the size of the area that needs excavating, remember to allow extra width, length and depth for a base, side and backfill. Additionally, if it is under an area of traffic, such as a driveway, it will need to be deeper than if it is in an untouched area.
After the area has been excavated, remove any large pieces of stone, tree roots or other debris, before laying gravel across the bottom. This will help to level out the surface and provide a surface on which the soakaway crates can sit.
During installation
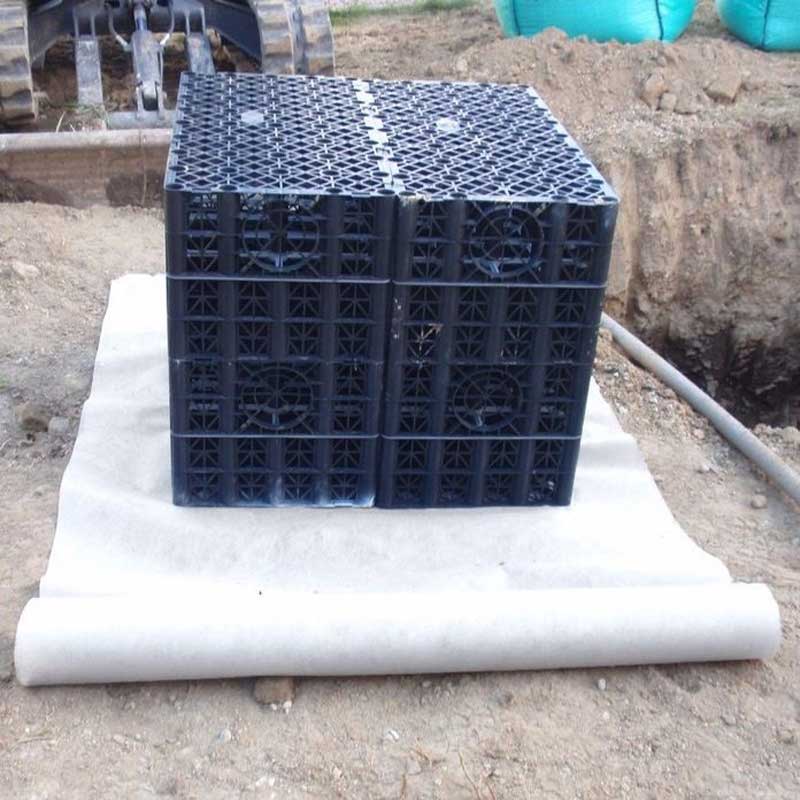
Wrap soakaway crates in a geotextile membrane
For best results, we’d recommend wrapping soakaway crates in geotextile membrane during the installation process – lay the membrane down before putting soakaway crates in, then wrap the membrane around the sides and over the top. Make sure you tape it down tightly to keep it secure. This will prevent any debris from entering the soakaway crates – debris and soil particles can build up over time and block the pathways of water. Stopping this will help to ensure the soakaway remains efficient and functioning.
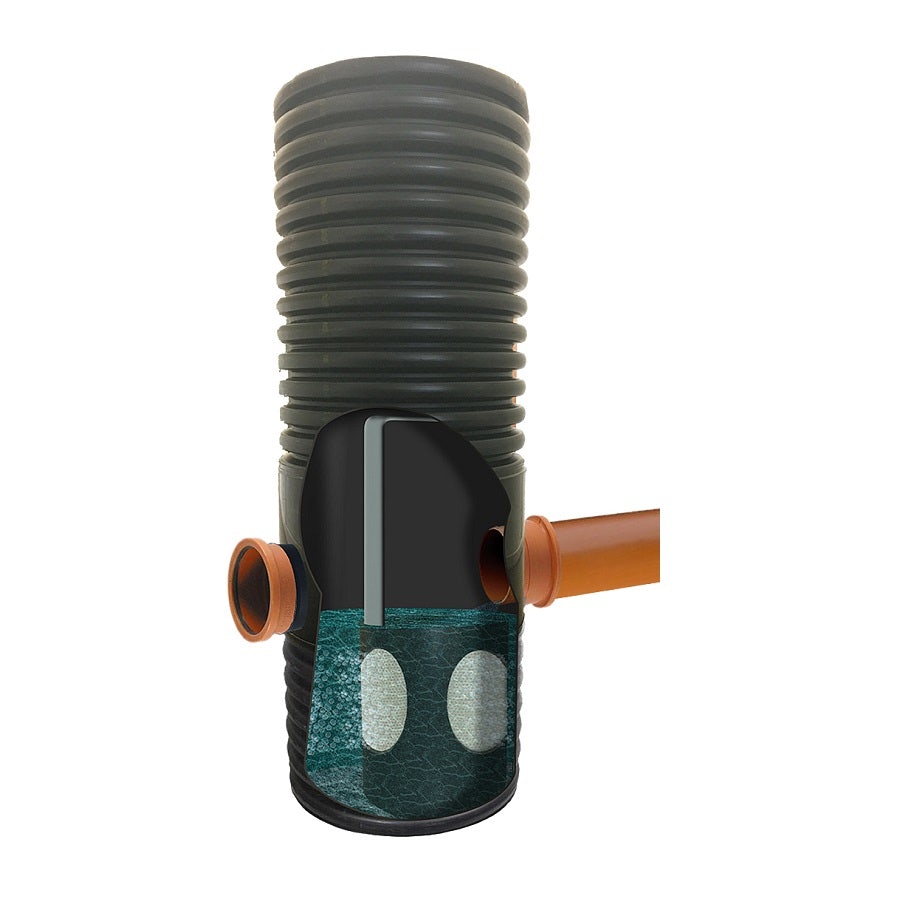
Fit a silt trap
If you’re looking for maximum efficiency and a long lifespan, you can choose to fit a silt trap on the drainage pipe that leads to the soakaway. A silt trap will prevent debris and silt from building up within the drainpipe, which can lead to blockages, flooding and damage. This will need emptying periodically, but can dramatically increase the lifespan and reduce potential blockages in your soakaway system.
Find the pipe entry point
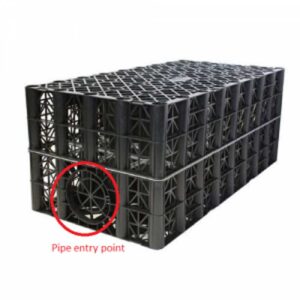
Some soakaway crates have a cutout, in which the drainage pipe sits, whilst others do not. Always check to see if your soakaway crate does have a pipe entry point – it might be a perforated cut-out that just needs popping out. If your soakaway crate does have a pipe entry point, mark it on the membrane before cutting the membrane and folding it around the pipe. If you are working with several soakaway crates, ensure that any other pipe entry points on the other crates face inwards. If your soakaway crate does not have a pipe entry point, the pipe should be pushed right up to the soakaway wall.
Back and side fill
Once the soakaway crates are in place, back and side fill is required to ensure the structure remains stable and in position. To do so, we’d recommend using sand or shingle material. As well as the back and side fill, a layer is also required on top of the soakaway crate, before the hole can be re-covered with soil and any other finishing products. If the soakaway is in an area that experiences some traffic, it is recommended to increase the amount of soil required on top – this will increase sturdiness and prevent ground movement.
To avoid a blocked soakaway system, read our helpful guide for hints and tips.

Was this guide useful?
Mentioned in this project guide:


