When you’re thinking of erecting a fence, you might not instantly associate installing gravel boards as part of the project. If you do decide that installing one would benefit your fencing job, then take a look through this guide to understand. We’ll talk you through the use and installation process of your own gravel boards for fencing so that you can finish the job with complete confidence.
Table of contents:
- What is a gravel board?
- How to install a gravel board
- What size concrete post do I need for a 6ft fence with gravel board?
What is a gravel board?
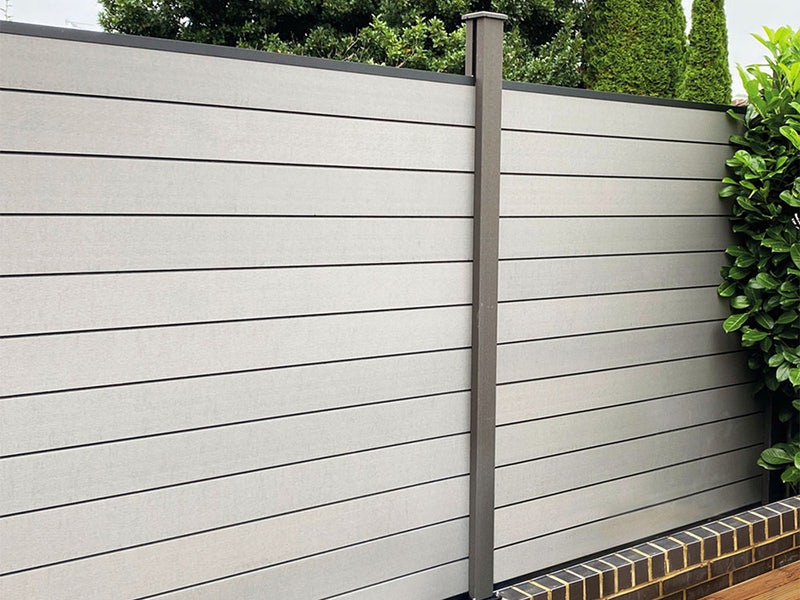
A gravel board is an optional part of a fence that can be added to the bottom to prevent panels from rotting. Essentially it is there to protect your fence from damage caused by moisture, debris or insects. They can typically be pretty easy to fit and ideal for that little extra security in the appearance of your fence.
The two main types of gravel board are timber and concrete. Timber is the one typically used by fence owners as they match the traditional look for their fence. Perfect if you plan to go with decorative fence panels.
The alternative concrete gravel board is stronger and not at risk of rot like a timber gravel board. However, its appearance is more obvious when used with closeboard or lap panel fences. Having said this, concrete gravel boards can be great for use with concrete fence posts. Not only because of the matching appearance, but because of the stronger and more secure final structure. Moreover, a low-maintenance solution!
How to install a gravel board
Here are some steps to help you install your gravel board – starting with timber!
Timber gravel boards
Note: Read instructions to determine fixing choices when obtaining tools and items needed.
What you will need:
- Treated timber board (thickness 22mm-25mm recommended)
- Small timber wedge or stainless steel metal strip (aka ‘cleat’)
- Nails or galvanised screws
- Steel gravel board clips
- Drill
- Hammer
- Tape measure
Step one: Make sure you leave a gap below each panel for the gravel board to be placed. Measure where you’re going to place your cleats and mark these locations on the post.
Note: If the fence is on a sloped area, you can fill the angled gap under each panel by cutting gravel boards to fit the slope.
Step two: Slot the board between the fence posts and use nails or galvanised screws to fix the boards into place:
- If using screws to fix the boards into place, countersink them.
- If using nails, drill pilot holes (two into the top and bottom along the centre line of each board) to reduce the risk of splitting in the wood and insert them at an angle into the posts.
Note: You can also use steel gravel board clips. These are screwed in place to the fence and into the boards.
You can now complete your fence installation!
Concrete gravel boards
A concrete gravel board has slightly different requirements when it comes to installation. Typically using concrete fence posts (e.g. a mortice post) alongside concrete gravel boards can ensure the appearance of the fence still looks good in the long run.
What you will need
- Concrete gravel board (thickness 22mm-25mm recommended)
- Two pin push-in metal strips (aka ‘cleats’)
- M8x80 bolts
- Nuts
- Round washers
- Square plate washer
Step one: As with timber gravel boards, make sure you leave a gap below each panel for the gravel board placement. Measure where you’re going to place your cleats, marking these locations on the post.
Note: Again, if the fence is on a sloped area you can fill the angled gap under each panel by cutting gravel boards to fit the slope.
Step two: For concrete gravel boards, you will need to have concrete galvanised two pin push-in cleats. Slot the cleat pins into the bottom holes of the mortice post and bolt the gravel board onto the cleat with an M8x80 bolt, nut and round washer. You will also need a square plate washer on the face of the concrete.
There you have it! Now you can finalise your fence installation.
What size concrete post do I need for a 6ft fence with gravel board?
As 6ft is the most common type of fence panel, you will typically need 8ft posts to ensure the panel is lifted off the ground. This does not change when using gravel boards unless the fence panel is higher. This also allows for the fence panel to be put beneath the panel as the fence posts sit in the ground and as such allow for a 150mm gravel board to sit beneath it.
It’s also worth noting this is down to personal preference. Whether flush or level with the panel, as long as you have the post at least 2ft longer than your panel, it can work.

Was this guide useful?
Mentioned in this project guide:


