You’ve spent plenty of time, money and effort creating your dream garden.
Now that it’s immaculate, you want to keep it that way. This means stopping people from trampling all over your fine landscaping endeavours.
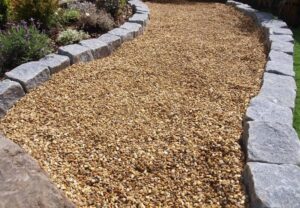
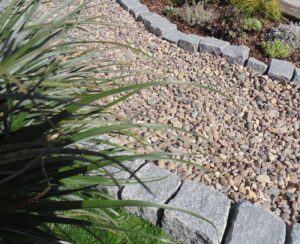
Realistically, the only way to do so is by laying a garden path. A gravel garden path is both functional and elegant, combining the best of both worlds.
The question is:
How do you prepare the ground before laying gravel?
What is the proper way to lay gravel?
You’ve come to the right place!
At Drainage Superstore, we’ll show you how to lay a gravel path like a pro.
Let’s dive right in.
Table of contents:
Planning for gravel paths in gardens
A gravel garden path is a lasting feature of any garden. So, it’s vital that you carefully plan ahead before you start digging!
Consider the following:
Will the planned location allow convenient access to all standout landscaping features in your garden without being a massive maze? Is the proposed location feasible?
While answering the former question requires only a bit of sketching and thinking about your typical movements around the garden as well as the latest gravel pathway ideas, it will take a bit more than that to satisfactorily answer the latter question.
Here’s the deal:
You’ll need to check the area carefully with a cable avoidance tool to make sure you don’t end up damaging any underground cables.
Once you’re satisfied that’s not going to be the case, it’s time to gather your tools and materials and get cracking.
You’re going to need the following:
- Pathway gravel. To get a general idea of the available options, check out the different types of gravel.
- Suitable gravel path edging, such as treated timber.
- Weed membrane
- MOT Type 1 levelling material
- Square shovel
- Wacker
- Rake
- Screws
- Drill
- Hammer
- Spirit level
Once you’ve assembled everything, simply follow these steps!
How to lay a gravel path
As is the case when laying a gravel driveway, the preparation and first couple of steps are the hardest and most time-consuming. So, it’s important to take your time and do them properly so as to avoid troubles down the line.
Don’t get discouraged – it gets easier after that!

Step 1: Dig the path’s channel
Lay out the position of the path using your wooden pegs and string. Then, mark the edges with your spade and the channel for your path. You’ll have to dig to a depth of 100mm. And that’s how to prepare the ground for gravel.
Step 2: Install the edging
Carefully place the timber into position. Then, hammer wooden pegs into the soil at regular intervals of approximately 1200mm along the edging and fix them to the timber with exterior screws. This will prevent the edging from caving in at a later point.
Use your spirit level to check the edging is level and make any necessary adjustments with the hammer.
Step 3: Roll out a weed membrane
A weed membrane or landscape fabric will prevent bothersome weeds from disrupting your new gravel path. So, roll it out carefully along the entire width and length of the channel. When overlapping, allow for a 50mm overlap in width and a 100mm overlap in length to ensure seamless cover for your aggregate pathway.
Step 4: Add the sub-base
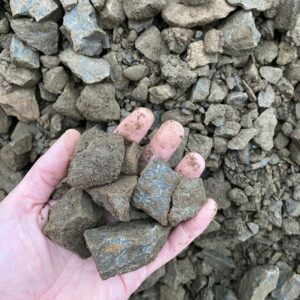
Next, you’ll need to add a 50mm sub-base layer. We recommend using Type 1 MOT, as it’s a tried-and-tested solution for garden paths, pavements, driveways and even roads.
In case you haven’t come across this material before, MOT Type 1 consists of larger 40mm limestone, gritstone, granite or basalt pieces and crushed particles.
Rake the sub-base until it’s smooth and compound it with your wacker. Go twice over the entire distance of the path and check to ensure the sub-base is level.
Step 5: Lay the decorative gravel
This is the fun bit!
Lay your decorative gravel over the sub-base to a depth of approximately 25mm and rake it until smooth. Ideally, this should leave a distance of about 25mm to the top of the edging and prevent any gravel from spilling over to your garden.
That’s how to lay gravel on soil! Your brand-new bound gravel path is now ready for use. No more trampled grass, plants or flowers.
Making the most of decorative gravel
Laying a gravel path is the first step towards making the most of decorative gravel.
No need to end there, though:
Why not take it up a notch by creating a gravel garden? The process is quite similar, so now that you know how to lay a gravel path, you’re already off to a flying start!
Don’t forget to check out our handy guide for more innovative gravel garden ideas.
Finally, complete your decorative gravel laying projects with a beautiful gravel driveway.
Trust us:
Before too long, your property is going to be the envy of all your neighbours!
Want to make sure you have a level surface? Opt for a gravel grid! Find out how to install one via our guide.
Was this guide useful?
Mentioned in this project guide:


